Powered By Blogger

Wednesday, January 7, 2015

Compensation Through Orchestration In BizTalk

Hi there,

Have you ever thought of rollback of a process through orchestration in BizTalk? Well, compensation is the feature which does that. Infact,compensation is the most underrated and underused feature in biztalk. A few days ago I was working on a R&D for a project to find out the features provided by compensation and to my surprise it stood to my expectations. But in this post, it would be difficult for me to explain the concept of compensation but rather I would be explaining the process which I incoporated in my sample project. I would advice you all to go through this fantastic blog by
Charles Young which clears the concept of compensation with transactions.Also, a very important point to keep in mind is that compensation works with those transaction which commits.

My Process


Explanation Of The Process:

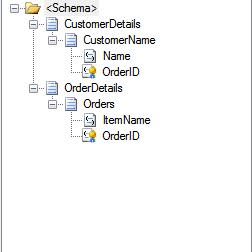
The above process is a simple example of compensation on a customer order. In this sample i took one schema with two root nodes - CustomerDetails and OrderDetails with a one promoted common field (OrderID) for correlation.


In my process i've used L-R transaction for each scope (Scope_Customers and Scope_Orders).Scope_Main is also L-R and kept my whole orchestration as L-R.
Each scope has a compensation block with its respective logic for rollback - i.e. delete operation.
The whole process is a simple insertion process in which first the customer detail gets inserted followed by the order details. And the logic of the process is based on the fact that if any of the two individual L-R transaction scope fails then rollback happens i.e. compensation block gets fired if an exception is caught by the main L-R scope. 

Scenario:

The process is fired and insertion of customer details are done. Now insertion of order details starts, but what if  due to some issue an exception is caught and insertion of order detail fails? In this case compensation acts as a handy feature which roll backs the insertion done in customer table because it got committed. When the exception is caught by any of the exception handlers which resides in the main L-R scope then the respective comensate shape will get fired and will refer to the defined scope (In this case, Compensate_Customer will get fired  on Transaction_Customer).
Also, I've kept a tracking variable- Status (of boolean type) for the decide shape which fires an Email to the developer that an exception has been caught and rollback got initiated.Status = 0 is for no exception and should be kept under expression shape of CustomerInsert and OrderInsert.While Status = 1 should be kept under the expression shape of  each of the exception handlers.

Expression Shape Contents In Customer_Insert Scope

Expression Shape Contents In one of the exception handlers


Also, keep the synchronized property of each of the individual transaction scope(Customer and Orders) to True if you want exception to be caught and keep the RetryCount and RetryInterval on each of the send ports to 0.

Compensation can be used with atomic transactions also but i didn't use atomic transaction in my process as i was consuming services from a request-response port (WCF-CUSTOM) and atomic transaction doesn't allows that.

Hope this post comes useful to those who were confused with compensation like me :)

Thank You.

Regards,
Saurav Suman
Software Engineer @ Agility


Tuesday, December 16, 2014

MQ Correlation Through Orchestration In Biztalk(Without Using MQSeries Adapter)

Hi there ,

In this post I'm going to explain in detail about how to push and retrieve message from IBM websphere MQ through orchestration in biztalk. To begin with, ensure that you have IBM websphere mq installed and configured in your system properly.

The Process:

The below screenshot depicts the overall process


1. Create any schema you like. I have created the following schema as depicted in the figure below.


2 . Add orchestration to your project. Create one receive shape of message type = your schema and bind it to logical receive port.


3. Drop one scope shape and make transaction type property of that scope to atomic.Inside the scope, place one assignments shape.


4. Add amqmdnet.dll file as a reference to your project. The file can be found at default installation directory : C:\Program Files (x86)\IBM\WebSphere MQ\bin

5. Create following variables under the above created scope.

a. quemgr - type: IBM.WMQ.MQQueueManager 
b. ReqMsg - type: IBM.WMQ.MQMessage
c. RespMsg - type: IBM.WMQ.MQMessage
d. rqstqueue - type: IBM.WMQ.MQQueue   
e. respqueue - type: IBM.WMQ.MQQueue
f. gmo-            type: IBM.WMQ.MQGetMessageOptions

6. I have written the following lines of code to push and retrieve the msg with same           correlationID from MQ.


7. I'll be explaining this code block by block from request message creation to response message    creation . Our primary aim is to push and retrieve the message from queue based on correlationID.
Create one variable of type System.xml.xmldocument. This variable will hold the values arriving from receive shape.

8. Now we will be generating guid for our request message.correlationID . I tried creating the guid in the expression shape but since XLang doesn't support byte [] array , i was compelled to make one class library for creating guid and using it to assign it to request message correlationID.

9. Add one C# Class library project in the same solution. Name it : GUIDCLASSLib and the class as ClassGuid.

10. Add the following lines of code as shown below:


11. Build the project and add the class library reference to your project. Also register the dll file in    gac through gacutil /i [dll name] command.

12. Now switch back to message assignment shape and assign the values retrieved from receive message shape to the xml variable : Variable_XML= Message_Rcv.

13. Copy the following code with values that of your environment.

IBM.WMQ.MQEnvironment.Hostname = "your host name";
IBM.WMQ.MQEnvironment.Port = your port [int]; //ex: 7714
IBM.WMQ.MQEnvironment.Channel = "your channel name"; //ex: APP.ALL

quemgr = new IBM.WMQ.MQQueueManager("Queue Manager Name"); //ex:SDCQMGR.T1

rqstqueue = quemgr.AccessQueue("Your_ request queue name",IBM.WMQ.MQC.MQOO_OUTPUT + IBM.WMQ.MQC.MQOO_FAIL_IF_QUIESCING);

respqueue = quemgr.AccessQueue("Your_ response queue naem",IBM.WMQ.MQC.MQOO_INPUT_AS_Q_DEF + IBM.WMQ.MQC.MQOO_FAIL_IF_QUIESCING);


The MQEnvironment sets the environment variables to the given values. MQQueueManager manages all the queues and channels which reside under it . rqstqueue variable is the instance of IBM.WMQ.MQQueue type which will act as a Request queue. Similarly, respqueue is of type MQQueue and will act as response queue.

14.Now we will be creating instance of MQMessage, One request message and response message respectively. First we will be instantiating ReqMsg variable.

ReqMsg = new IBM.WMQ.MQMessage();

15. Copy the following code for setting the property of request message. This request message carries the content of xml file which we are receiving at receive shape.

ReqMsg.WriteString(Variable_XML.OuterXml); \\the original message.
ReqMsg.Format = IBM.WMQ.MQC.MQFMT_STRING;
ReqMsg.MessageType =IBM.WMQ.MQC.MQMT_REQUEST;
ReqMsg.Report = IBM.WMQ.MQC.MQMO_MATCH_CORREL_ID;
ReqMsg.ReplyToQueueName = "FOCiS.TO.EIL";
ReqMsg.ReplyToQueueManagerName = "SDCQMGR.T1";
Variable_obj = new GUIDCLASSLib.ClassGuid(); \\ create variable Variable_obj of type GUIDCLASSLib.ClassGuid()..

ReqMsg.CorrelationId = Variable_obj.returnguid(); \\assigning the guid to correlationId

16. Now put ReqMsg into rqstqueue :

              RequestQueue.Put(ReqMsg);

17. Log the request message.

        System.Diagnostics.EventLog.WriteEntry("RequestQueueMsg",ReqMsg.ToString());
18. Similarly instantiate the response message variable RespMsg .

RespMsg = new IBM.WMQ.MQMessage();
RespMsg.MessageType = IBM.WMQ.MQC.MQMT_REPLY;
RespMsg.CorrelationId = ReqMsg.CorrelationId;

19. Also add the following lines of codes for GetMessageOptions.

gmo = new IBM.WMQ.MQGetMessageOptions();
gmo.Options = IBM.WMQ.MQC.MQGMO_WAIT;
gmo.WaitInterval = 5000;
gmo.MatchOptions = IBM.WMQ.MQC.MQMO_MATCH_CORREL_ID;

20. Now get the response message by passing RespMsg and gmo as parameters to ResponseQueue.Get() method.

ResponseQueue.Get(RespMsg, gmo);

21. Log the response message:
 
     System.Diagnostics.EventLog.WriteEntry("ResponseMessage",RespMsg.ReadString(RespMsg.MessageLength));

22. Sign and build the project and deploy it to Othe BTS. You can also create one send port to send the response message to the disk. After deployment configure the application with one receive port and location . Drop the generated instance into the the receive location and check your event log.
That's all, your job is done.

I tried explaining the subject in the best possible manner I could. Your doubts and suggestions would be whemingly responded.

Hope you all had a good read. Happy blogging and reading :) .

Thank You.

Saurav Suman
Software Engineer @ Agility
Hyderabad,India.


Thursday, October 9, 2014

Parallel Convoy Correlation In BTS

Hi there,


In this blog , i'll show you how parallel convoy correlation works in biztalk by showing a pracical example.A parallel convoy enables multiple single messages to join together to achieve a required result.The set of related messages can arrive in any order, but BizTalk Server must receive all of them before starting the process.

Scenario:

Suppose you go to a shopping site and you decide to buy an item, your item will not be booked unless and until the system receives the payment confirmation as well as the stock availability.
We will be creating two schemas here, one for the payment and other for the stock availability with one common field element Status so that we are able to correlate these two schemas.

Steps

1.Create one schema for payment information


2.Create one schema for stock availability


3.Promote the Status element of both the schemas. (Do Quick Promotion)

4.Add an orchestration process to your project.

5.Perform the following steps in orchestration.

 a)Drag and drop a parallel action shape.


 b)Take two receive shape


 c)Now go to the orchestration view and expand types. Right click correlation types and add new            correlation type. Update the correlation property as shown in the figure below as well as the
   description,identifier.


 d)Similary add a new correlation set as shown in the figure.


 e)Rename one receive shape to Receive_Payment and set the following properties:

    Activate = true; Initializing Correlation Set=Name of Correlation Set; Message and operation.

 f)Rename the other receive shape to Receive_StockInfo and set the following properties:

    Activate = true; Initializing Correlation Set=Name of Correlation Set; Message and operation.

 g)Make a final destination schema as shown below


 h)Drop a transform shape in your orchestration process and update it as shown below,make         destination your final send shape.


 i)Link the source schema and destination schema as shown below


 j)Finally drop a send shape with message type = your destination schema

 f) Your whole business process should look like this:


6.Sign your project and deploy it to biztalk admin console

7.Configure your send, receive port and orchestration accordingly in administrative console.


Do leave your comments if you face any problem.

Happy blogging!!

Saurav Suman
Software Engineer @  Agility

Wednesday, October 8, 2014

Renaming Your Biztalk Machine Without Loosing Data

Hi there,

I recently came across a situation where i had to change my machine name.You all may be wondering about the big stuff in that but let me tell you that it turned out to be a big headache for me when i had to reconfigure my biztalk again as i had to preserve my old data.I followed the following steps which helped me to get my biztalk running back....

Note: Do this on your own risk, it worked for me but i'm sure if you follow the steps carefully it would work for you too.


Steps to configure your biztalk incase of machine name change

1. Add your current domain as member to each biztalk group by going to the computer management.

   Administrators,BizTalk Application Users,BizTalk Isolated Host Users,BizTalk Server  Administrators,BizTalk Server B2B Operators,BizTalk Server Operators,SSO Administrators(Very  Important).

2. Navigate to  your installation directory and search for SampleUpdateInfo.xml file.
   You can find SampleUpdateInfo file in Microsoft  Biztalk Server 2013\Bins32\Schema\Restore           folder.

3. Edit SampleUpdateInfo file like this:-
 
   Find and Replace all the “SourceServer” value with your original Server name.
   Find and Replace all the “DestinationServer” value with your new Server name.
   Stuff related to Analysis, BAM, RuleEngine, HWS, and EDI are commented by default, if you are      using them in your environment un-comment the required ones.

   save and close the file after editing.

4. Open Command prompt and change the directory to following location :
    D:\Installation\Microsoft  Biztalk Server 2013\Bins32\Schema\Restore

  (You would have your biztalk installed in different drive but the script files reside under                     \bins32\schema\Restore folder)

5.After changing the directory, run the following command to update the biztalk database:-

   cscript UpdateDatabase.vbs SampleUpdateInfo.xml

 //Make sure that the management database,messagebox db and rule engine db gets updated.

 Again run the following command for updating the registry:-

   cscript UpdateRegistry.vbs SampleUpdateInfo.xml

 //This script will update the local registry with the correct server name. You need to run this script on each BizTalk server you have    in the group.

6.Restart the WMI service by going to services.msc
 
  //This step is required because most of the administration tasks you perform from the admin console depends on WMI.

7.Promote the new server as master secret server:
  Follow these steps :-

A) On the Start menu, click All Programs, click Microsoft Enterprise Single Sign-On, and then click SSO Administration.

B) In the scope pane, right click System, and then click Properties. The Master secret server is displayed on the General tab of the System    Properties dialog box.

C) Click Change to select a new Master secret server.

D) Logon to the new Master secret server to restore the Master secret to the registry of the new Master secret server.

E) On the Start menu, click Run, and then type cmd.

F) At the command line prompt, go to the Enterprise Single Sign-On installation directory. The default installation directory is
   :\Program Files\Common Files\Enterprise Single Sign-On.

G) Restart the new Master Secret Server.

H) Type ssoconfig –restoreSecret , where is the path and name of the file where the master secret is stored.
   The master secret is stored in the registry at the following location:
   HKEY_LOCAL_MACHINE\SOFTWARE\Microsoft\ENTSSO\SSOSS

8.Restart your machine.

9.Open Sql Server Management Studio and logon using windows authentication

  Check the following table and column name under BizTalkMgmtDb for new server name, if the column still has the old server name then update that with the new server name:-

   adm_group table, SSOServerName
   adm_server table, Name column
   adm_MessageBox, DBServerName

10. Restart all the BizTalk/SSO services.

11.Open the BizTalk administration console, click on the existing node (the one pointing to original server), right-click and remove.
 Right click on the “BizTalk Server 2006 Administration” node and select “Connect to Existing      Group…”. Provide the new Server Name and select the BizTalkMgmtDb database.

Click Ok.You will get all your application. Incase the host instance is unable to start, try reconfiguring it with your btsadmin credentials.

12. Restart your system again and try running any working application.If you are able to run your application then your setup was a success otherwise you need to look into the the error and try resolving those errors by yourself.


Sunday, August 31, 2014

Creating a flat file schema through a wizard in biztalk


Hi there,


It has been a way long since I wrote my last blog. These days i'm working on a new technology named biztalk which according to me has so far been an interesting endeavour in my tryst with biztalk programing :P . Biztalk is one of the widely used integration tool available in the market which supports extensive B2B & EAI integration developed by microsoft. But I'm not writing this blog to explain what biztalk is and what it does. Here is the link to the brief introduction of biztalk --msdn- BizTalk Introduction .
Rather, i'm here to share the inbuilt capabilities of biztalk artifacts which form the backbone of biztalk runtime architecture i.e adapters,pipelines,orchestration,schemas and maps . It would be impossible for me to briefly introduce all the artifacts in a blog and therefore i decided to go with oneartifact/blog :) ....

Schema is one of the important part of biztalk architecture which i will be discussing here. Basically, a schema is something which creates the structure of a file and that file could be anything ranging from xml to flat files.The extension for schemas in biztalk or any other tool is .xsd (XML Schema Definition). The work of schemas is to define the structure of the message it receives, based on which we can create an instance of the generated xsd file into the format we want. Biztalk supports following type  schemas : -

1.XML schema
2.Flat file schema
3.Envelope schema
4.Property schema

For a biztalk beginner, XML schema and Flat file schema should be of concern so as to grasp the logic behind these two schemas so that we meet with minimum problems while facing complex types of schemas.
I will start with flat file schema and in this whole process would be dicussing in brief flat file schemas.
A flat file is a file which consists of records with no structured relationship and stored data in a plain text file.
Flat file are of two types:-

1. Delimited flat files - Example - 1,Saurav,SoftwareEngineer,sauravsuman007@gmail.com

---  In delimited flat file schema the elements of a record are identified after a delimiter like (,) etc.

2. Positional flat files - Example - 1 Saurav SoftwareEngineer sauravsuman007@gmail.com

--- In positional flat file schema the elements of a record are separated by space and are of fixed length

Creating Flat File Schema through a Wizard :

1. Create a BizTalk project by navigating as shown in the figure


2. Select Empty Biztalk Project under biztalk templates


3. Now open notepad and type the following as shown below


After creating the notepad file, save it with appropriate file name of your choice 

4. Now switch back to visual studio and do the following:-  right click on project ----->add---->new item


5. On add new item dialog, select flat file schema wizard as shown below 


6. On the consecutive page give the path of your instance file name which you created in notepad and name the record name as EMP and click next


7. The next will show you all the record, select only one line of record as shown below. Do not check wrap long lines. 


8. On the next page select delimiter type as your file is a delimiter type.


9.  Proceed further by clicking the next button without modifying anything


10. Select record in element type and click next


11. Keep clicking the next button until you meet up with the screen shown below. Select (,) as child delimtier type and the proceed further by clicking the next button.


12. Proceed further and finish the wizard process. Now open properties of your falatfile schema and browse the file you want to five to give to your input instance filename. Similarly repeat the step for output instance filename.


13. Now validate your schema by right clicking on you schema file and selecting validate schema


14. After valdating schema repeat the step for validating instance. If validation is successful then a xml file instance would be created on the specified output instance file name path. Open your instance by holding the ctrl key and pointing to the path name showm in the output


15. You will find your xml output but this shows only one record.


16. For all records to show do the following as shown below


17. Your final output


 For beginners, it is strongly recommended to first make your schema using the wizard and then try making it manually wherein if in case you get stuck in the process you can quickly switch back to the properties window of schema made through the wizard.

 I hope it was a good read and  look forward to your queries and feedback.

Happy Blogging!!

Saurav Ambastha
Software Engineer @ Agility

Monday, April 1, 2013

Where am I ?


Hi there ,

The day when i took interest in mobile programming, i had no idea that this could one day become my most interesting hobby. It was on 24th march when i built my first successful android app for my sweet niece who was coming to my home for holi.

That app consisted of random pictures of animals which when the user clicked changed the image with a background sound of that animal in the image. Building that application was an easy task than what i was going to build next.

The next idea which was floating in my mind after the completion of my first app was to build an application which would catch the location of the mobile user and that the user can text his/her location to a friend.
This whole idea looked impossible until i came across some useful resource which helped me a lot to build this app.

It took about 3 days to build this app. Here i present some snapshots of my Where am I? android application.


This is the first screen shot. First successful testing  for text message was done
by entering any number to Texting.PhoneNumber() method.

This modification was done keeping in mind that only one number
cannot be embedded  for texting, so i introduced a textbox wherein
the user will enter the number.


This is the final and complete view of Where am I? application.


Now as soon as the user clicks the send button, a text message containing the current address will be sent to the phone number entered in the text box.
Download links of my app will be soon published here once i register myself to a free file hosting site. 
But if you want to download now then you can email me your request on my gmail id-- sauravsuman007@gmail.com. I'll reply you back with a link to download this app.
The next in line is the "Quiz Master" which i hope would revolutionize the way current quiz apps are.

Love,

Saurav Ambastha


Monday, November 12, 2012

WEB MATRIX 2 - Web development made easy.


Hi There,

It has been a way long since the last post. To continue with this post which gives a brief introduction on how Micrsoft's Web Matrix 2 has made the world easy for web developers,I would like to highlight a few points about this IDE.

With the key razor tool incorporated, this sleek IDE promises to give a rich, more user friendly look to websites. With supports like adding a database with clicks it has made web development more exciting and a fun to work with.

I couldn't wait to share the bold features of this development tool. The next of lines of this post will help you get an exciting look of its features.

------------------------------------------------------------------------------------------------------------


About


Microsoft WebMatrix is a free, all-in-one, extensible web development application for Windows, developed by Microsoft. WebMatrix lets web developers build websites using built-in templates or popular open source applications, with full support for ASP.NETPHPNode.js and HTML 5.

In 2011, WebMatrix was released to support the large number of open source content management systems and to provide a lightweight web development application for PHP and the new, simplified ASP.NET Web Pages. It focused on a clean, simple user interface allowing web developers to build websites from scratch or by customizing open source web content management systems such as DotNetNukeUmbracoJoomla!Drupal and WordPress, among others.
From 2011 to 2012, WebMatrix 2 Beta and RC releases added support for Node.js, mobile simulators, additional website templates, publishing to Windows Azure Web Sites and more. On September 6th 2012 the official release of WebMatrix 2 went public.
ASP.NET Web Matrix, whose name was the inspiration for WebMatrix, was released in 2003 and later discontinued.
Source:- en.wikipedia.org/wiki/Microsoft_WebMatrix

Having personally used the tool , i got a feeling that this IDE has been built keeping in mind the level of new developers. This tool has a mixed bag of goodies both for new developers and the professionals. 

With the preloaded templates, it allows building sites of various categories by just a few clicks. With support extensions like Tweeter feeds, Blog feeds to websites, it promises to give a more enriched look to websites. To have a glimpse of this IDE, I've shared a few screenshots.


The Home Screen Of Web Matrix 2
                                                 
Quick Start Menu

Building a simple CSHTML site with Web Matrix 2


One of the most useful feature of this IDE is the introduction to Razor syntax.Razor syntax can be embedded in ASP.Net web pages framework. The Razor syntax is light weight tool that doesn't use server controls but instead makes easy to integrate server side code with HTML.

With WebMatrix, all you need is to build and maintain a web application. By using it , a software provider should be able to build a system cheaper and quicker.We look forward to its performance in market , but this product promises well.

Love,

Saurav Ambastha


Links-- http://www.hanselman.com/blog/WebMatrix2FrontEndWebDevelopersTakeNoteASPNETPHPNodejsAndMore.aspx